Sunday, October 30, 2011

Deck the Halls

I make a terrible blogger because I'm so bad at documentation.  I always get so caught up in the moment I forget to take photos.  I like to say I live in the moment, not in the memory.  So besides my friend and I forgetting to take photos of each other in our costumes before the Scream Awards (there was no phones or cameras allowed inside, and only later did we realize how many people totally disregarded this rule, as should have we)  I also completely forgot to take any photos of my lovely spread at my annual Scary Movie party.  So before this Halloween Month is over I thought I should at least share some of the decor I've put out this season.


These terra cotta ceramic pumpkins go great with our mexican tiles on the porch.


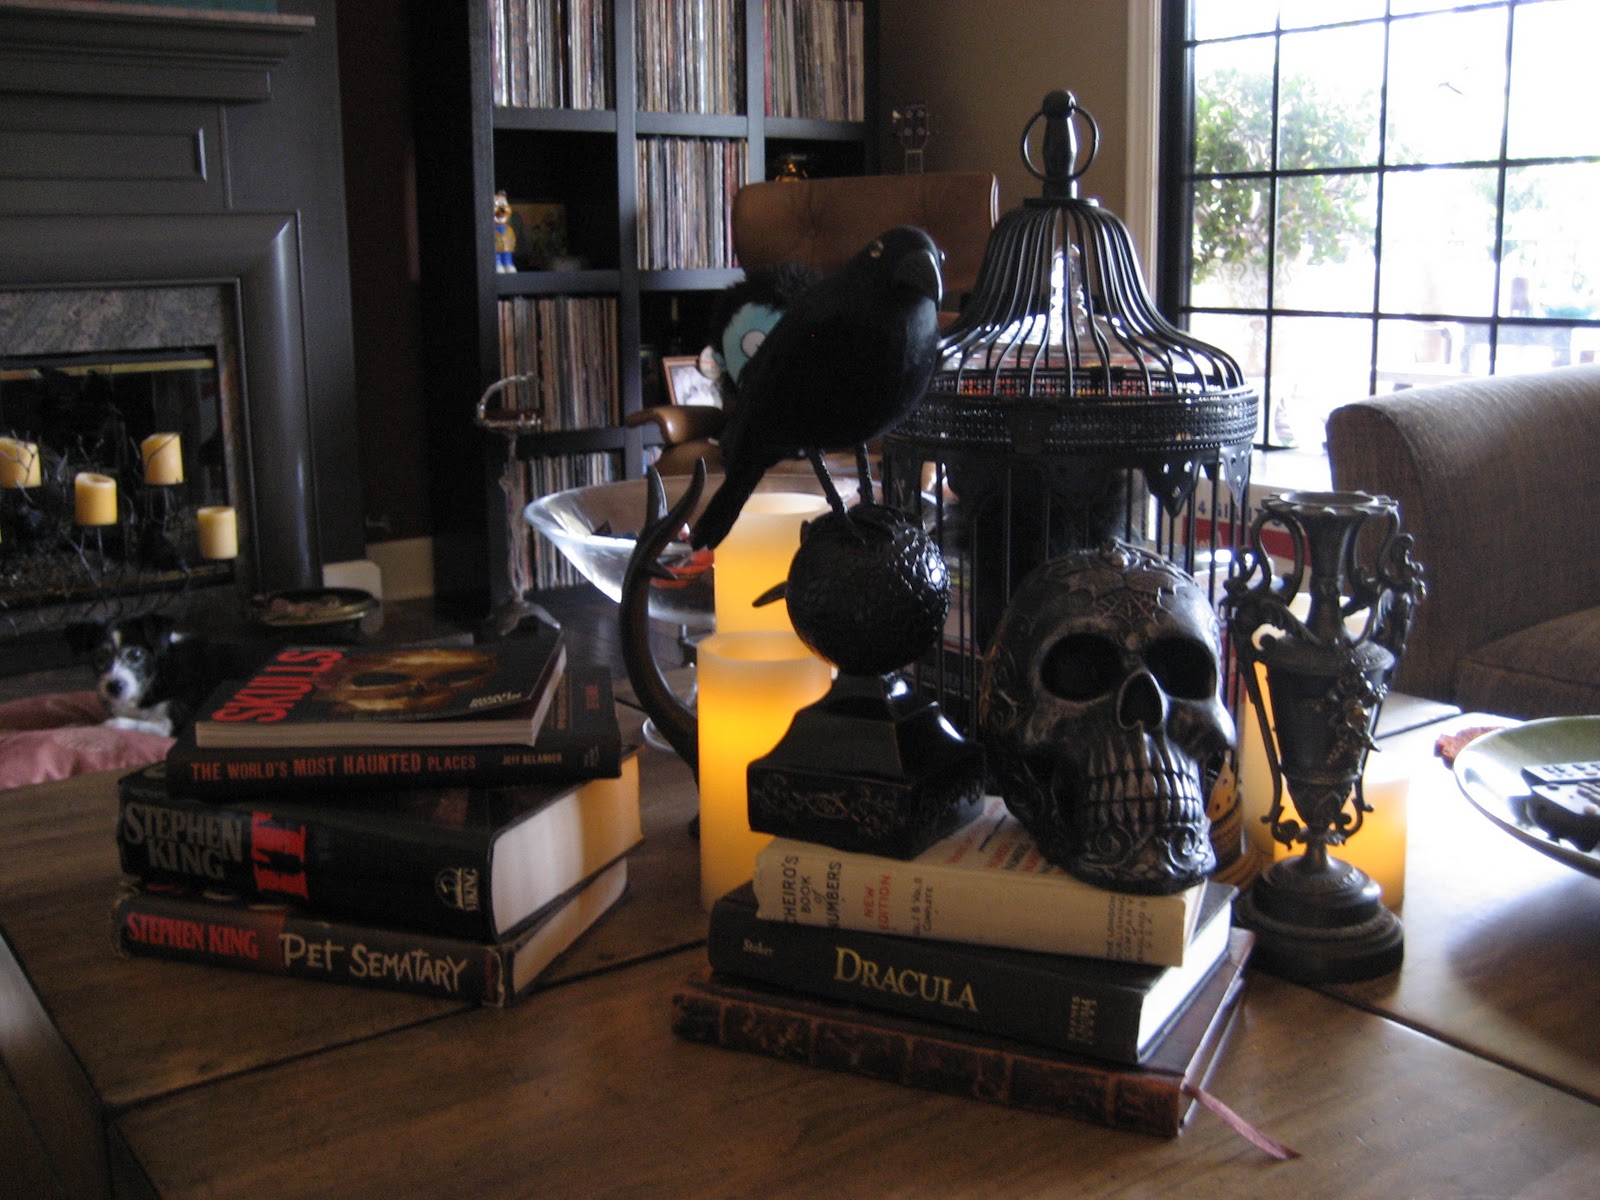
I always like to break out any Halloween related books for the coffee table.  There's a black owl hiding in the cage, which is actually a votive holder I found at Target in the candle section, not marketed as a Halloween item.  The "urn" is an antique vase.


This candle holder from Pier 1 is also not an actual Halloween decoration, but with some black crows it transforms into one.  My dog Domino must have seen a ghost!


This is "Lumpy" which I acquired at Knotts Halloween Haunt this year, and little Michael Myers which I purchased at Rob Zombie's Halloween Town in Burbank.  I also had gotten a little Jason which was given away as one of my party prizes.


And "Mrs. Slim Goodbody" was a gift several years ago from a dear friend.


A severed hand from my Halloween costume has served many purposes this year from smuggling snacks and liquor, to holding a bar of soap in the bathroom.


Some of the blood jar votives I posted about previously.


My dining table looks like Halloween barfed on it.  It's kind of hard t make this room look spooky because it's so light and full of warm wood.


I found the skeleton lights in the dollar section of Target, which turned my Halloween tree into a lamp.


I love these ornaments that are reminiscent of the characters in Tim Burtons Nightmare Before Christmas.  They sell them at Pier 1 and I always pick up a few new ones when they go on sale after Halloween.  Speaking of Tim Burton, tomorrow is the last day to see his exhibit at LACMA in Los Angeles, so if you have the chance do go!  It was everything I dreamed of and more, Tim Burton is such a visonary!


A somewhat failed attempt at photographing the illuminated votive jars.


Here's kind of the aftermath of part of my party spread.


I had a great bar setup too, but alas I did not capture it.  I can't believe I'm going to have to tear this all down the day after tomorrow.  I have a few more Halloween posts coming though.  I plan to dress up tomorrow (AND TAKE PICTURES!!) even though I have absolutely nothing planned.  I wish we got trick or treaters, but we don't.  Our street is way to dark and all the kiddies here go to Malibu West.

Happy Halloween everybody!!


Saturday, October 29, 2011

Green Halloween: New Uses for Old Things

I've been washing and saving jars instead of recycling them because of this great idea for halloween votive holders I got from Creepy Cupcakes.  I made about ten this year and I want to keep making them in various sizes for future years, because they look great in cluttered groupings, on windowsills or lighting entry paths and porch steps.  With the flameless candles you can do so without the worry of burning down your home.  Costco has a great set of remote control operated ones I've been smitten with this Halloween season, as it makes it so easy to turn them all off before retiring to bed.


They look amazing and grimy when flickering in the dark, though I wasn't able to photograph them well to show this.  The look is very reminiscent of something you'd find in the kitchen of the the farm house in The Texas Chainsaw Massacre or the basement in American Horror Story.  You can add body parts, bugs, or even nails inside along with the candles to up the creepy factor.

Another item I've been hoarding is the plastic zippered bags that linens come in. Of course these are a bit harder to come by, unless you are one to redecorate your bedrooms frequently, so I've asked for friends and family to save these for me.  These nifty little storage bags work great for me to package my homemade Halloween costumes each year.  I can keep everything together and ready to go, should I wear it again, or loan it to a friend in need.  I spend so much time on my costumes, it makes sense to preserve them this way for future wear, or even archival purposes.  The clear card slots are perfect for sliding in a photo of you in the costume, and the end result is just like a costume shop product for purchase, only better.


Thursday, October 13, 2011

Bloody Cracked Nail Manicure

I will be wearing the syringe gloves as part of my costume, so I suppose it doesn't matter what my nails look like.  But I'm a stickler for details, therefore had to give myself a special matching manicure.


I've played around with the new Sally Hansen Crackle polish before, and while I'm not crazy about it for everyday, I think it makes great monster nails.  The white over red gives a really nice bloody cracked effect.  I've also thought black crackle polish paired over one of those army green shades would make great zombie (or witch) nails. 


For this manicure I used 2 coats of Essie Fishnet Stocking (my bridal shade), followed by one coat of the Sally Hansens Crackle overcoat in white.  You have to work fast with the crackle, and try to get it not too thin, nor thick.  The end result is to die for! 

Happy Halloween!!!

Blood Splatter Application: Costume Sneak Peak Part II


So yesterday I went about applying blood to my costume.  I tried several different techniques, flinging drops and splatters from the paint brush, pouring large pools of blood, making drips, and wiping my bloodied glove as if someone (or something) was clawing at the garments.  I used Spirit Halloweens Blood Bath theatrical blood.  It had a nice thick dark realistic consistency that got lighter as it spread much like real blood.  The downside is that after drying the blood looks matte and not as deep red and lovely as in the photos (almost more burgundy), which has been a problem in the past with other dyes and food colorings as well.  I'm thinking maybe if I paint over it with glossy Mode Podge, I can get back some of the wet look to it.  I'll have to pick some up tomorrow.


I'm feeling a little defeated still about the contact debacle, because I have done so much advanced planning, and yet everything is not going as planned.  I looked into getting contacts at a local location, but I would still have to wait 5 days to get them after a fitting, so it's too late.  I'm sure once I get my makeup done I won't even miss the contacts.  The artists at the Mac Hollywood and Highland store are brilliant.  

Still I've been second guessing my blood splatter and wish I could start over.  I feel like I got a little overzealous in some places, but is that even possible when talking about bloodied garments?  I think I'm just being a bit morose.

And I always thought I had blue eyes!

So I ordered my halloween contacts over a month ago, but didn't bother trying them out until tonight and was sorely disappointed.  The color is called "zombie grey"and I was expecting something like this:


But here is a before and after of me wearing the contacts:


Can you tell the difference?  My husband didn't even know I had them in!  I don't know what to do now, as I don't have enough time to order a new pair and get them before Saturday.  I don't think I'll wear these though, it seems like a lot of trouble wearing uncomfortable contacts for so little drama.  I looked in my email for my order information, but it was deleted long ago, and I can't remember which online store I got them from to complain.  They probably would have made me blind anyways so maybe I'm better off not wearing them.

Halloween Bootlegging

Or "bootlimbing" or "How to Smuggle Booze Into an Awards Show"

Step One: Make incision.


Step Two: pull out innards, hollowing out a section of the limb.


Step Three: Choose your poison


Step Four: Fill the void.


Step Five: Dress the wound.


Step Six: transport in inconspicuously clear bag.


Happy Halloween!!!  18 days and counting!!!

Tuesday, October 11, 2011

Scream 2011 Costume Sneak Peek

So I know I was off to a great start with the Halloween themed blogging, then I kind of dropped off and I apologize.  I've just had so much going on.  We adopted a new dog, then there was Mickeys Halloween Party (so much fun), afterwards I caught a cold, I've been loaded down with work, and I've had a lot of horror themed television watching to do.  Obviously I have several posts to catch up on.

The other endeavor that has been eating up my time is finishing up my costume for the Scream Awards on Saturday.  I've gotten casted seats and here is a description of my original costume:

"A deceptive siren posing as an angel of mercy, offering the afflicted an end to their pain and suffering, who is really an agent of satan, harvesting souls for hell."

I've completed all of the sewing and construction, have my contacts and my makeup appointment booked, and most of my accessories.  This is all I have left to be completely ready:

  • blood splatter garments
  • get contact solution and eye drops/test out contacts (to see if I can even stand having them in)
  • buy tights
  • test hair style
So anyways, without further ado, here is a sneak peek of my Freddy-meets-Evil-Nurse gloves:


I was really pleased with the way these turned out.  They have really great movement and look extra creepy and sinister which is exactly what I was going for.

The Scream Awards premier on Spike TV on October 18th.  Vote for your favorites here.


Tuesday, October 4, 2011

To Die For: Skeletal fashion you WOULD be caught dead in


Let's face it, skulls and bones are never going to go away in fashion.  As a designer I've actually gotten very sick of the skull/skeleton/ribcage icon, as the more popular it's become, the pieces have become, generic, ugly, and down right tacky.  However there are still some beautiful ways to wear bones without looking like an Affliction/Ed Hardy fashion victim or a death obsessed teenager.

DSQUARED2 Fall 2010

DSQUARED2 Fall 2010

I love love love DSQUARED2's Fall 2010 collection.  I actually managed to get my hands on the glitter booties in silver, but unfortunately they were too large and I was unable to obtain the correct size.  Woe is me.  The spinal heel is even more macabre!

Sakadit Road skeleton bracelet

This Sakadit Road skeleton bracelet is gorgeous!


Rodarte for Target 2009 sequin skeleton dress

I loved Rodarte's Target collection, and this was one of the three dresses I had to have.  Because of the price point the ribs are screened on the sequins and the back is plain fabric, but it is still a great cheap dress.

Vivienne Westwood skeleton earrings


Delphina Delettrez special order skeleton hand bracelet

Low Luv X Erin Wasson bone cross necklace

Givenchy bones leather cuff

I would love to own any of this jewelry, but the Delphina Delettrez skeleton hand bracelet is definitely the statement piece.


And I would KILL for this  Alexander McQueen feather-fringe skull box clutch.  Wouldn't you?

Monday, October 3, 2011

October Calender of Events

Sally Hansen limited edition Halloween "Spun for You" nail strips will last all month.

-October 1:  attending Knotts Scary Farm Halloween Haunt

-October 2: Dexter season six premieres on Showtime


-October 5th: American Horror Story premieres on FX

-October 7th: attending Mickey's Halloween Party at Disneyland in costume

-October 15th: attending 2011 Scream Awards in costume

-October 16th: The Walking Dead season two premieres on AMC


-October 18th: 2011 Scream Awards premieres on Spike TV


-October 22nd: hosting annual Scary Movie Party at my house


-October 31: Halloween plans TBA

Stay tuned to my blog for more DIY Halloween inspired projects, party and baking ideas, Halloween costume reveals, and more spooky fun all month long!

DIY Creepy Crawly Wreath


Here's what you will need to make this fun Halloween inspired wreath, modeled by Maizee, one of my three adorable nieces.

-grapevine wreath (available in many sizes at your local craft store, I got mine at Michaels)

-black spray paint (I prefer Design Master flat black 725)

-hot glue gun

-assorted spiders, cockroaches, centipedes, bats, and snakes (I recommend the dollar store)

-black ribbon (also purchased at the dollar store)

- 1 twist tie

Directions:

1. Spray wreath outside, over scrap cardboard, on one side, making sure to get all angles and cover branches well on outside and inside areas of wreath.  Let dry for 20 minutes.  Turn wreath over and spray other side at all angles, let dry for 20 minutes.  Flip over and do a second coat on the first side, and then the second side leaving 20 minutes dry time in between, and making sure all surfaces are covered in black paint.

2. Attach any snakes first, no glue gun required, as they can just be pulled and woven between vines.  Affix the other crawlies as desired with hot glue gun, holding each individual crawly for a minute or so, while glue sets.

3. Tie bow in desired style and affix it to wreath with twist tie.

4. Hang on door to ward off solicitors.


Happy Halloween: 28 days and counting!!